Right Your Wrongs in QuickBooks Online
Did you accidentally make a duplicate payment? Or maybe you filled out payment information incorrectly? Did your check get lost in the mail? As hard as we can try to avoid mishaps like these, they’re inevitable. It happens! Sometimes it isn’t even your fault.
Let’s fix those mistakes!
Here is my process for voiding checks or bill payments In QuickBooks Online:
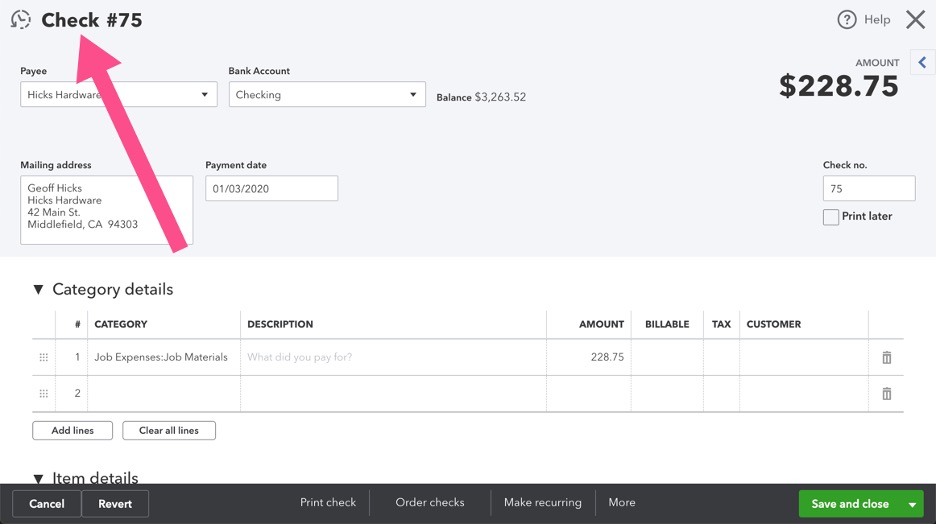
First, determine the transaction type. Is it a QuickBooks Online “Check” or “Bill Payment”? The transaction type is shown in the top left corner. An example is shown below.
Void Check
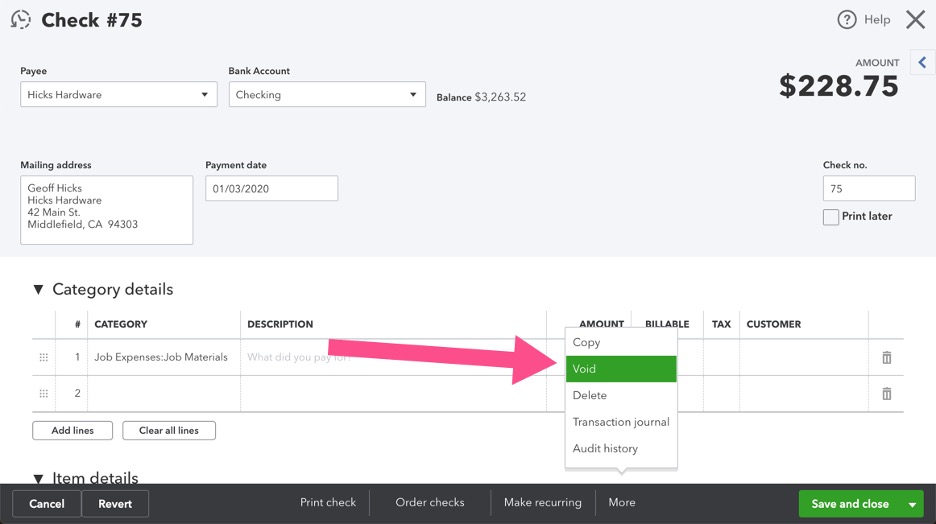
If it’s a “Check”, locate the check transaction and determine whether the check is dated in a closed period. In the case that the check was dated in an open period, select ‘More’, then ‘Void’ in the bottom menu bar as shown below.
Done!
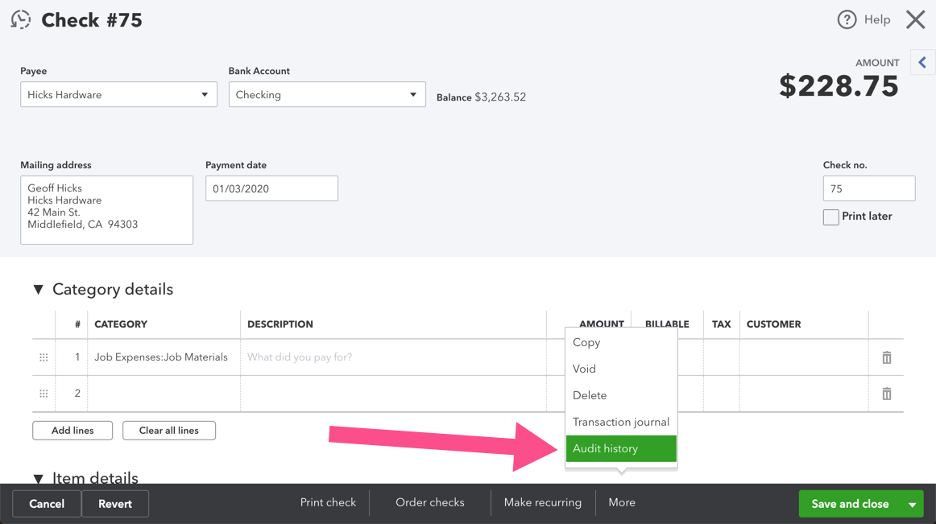
It’s possible that the check was dated last year, but you already closed that time period. In this case, don’t use the Void feature. That would zero out this check and affect the general ledger as of the transaction date in the closed period…which would change prior period account balances. Instead, first verify that the check is not reconciled. To do this, select ‘More’, then ‘Audit History’ in the bottom menu bar, as pictured.
On the Audit History screen, expand the topmost entry to view the details. Pay attention to the ‘CLR’ column, here you can confirm the reconciliation status.
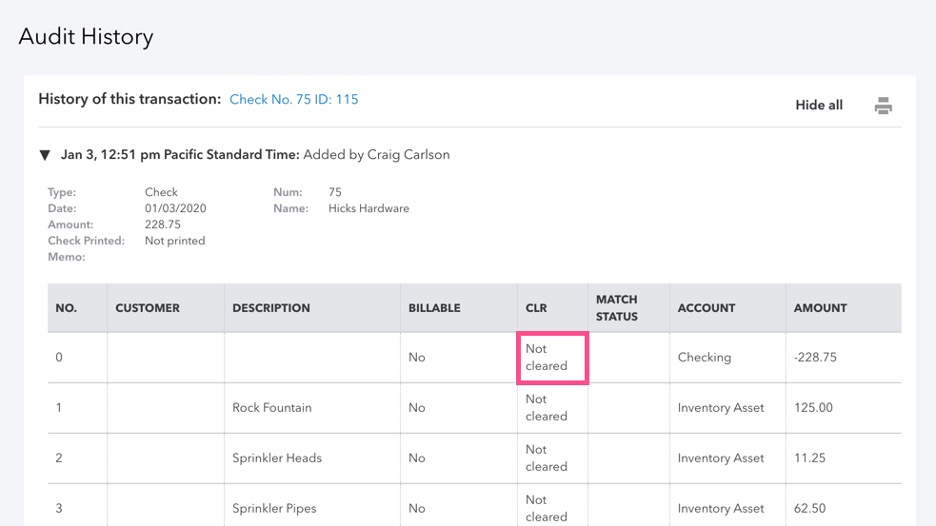
You can see that the check has not cleared. Therefore, click the blue hyperlink back to the transaction screen and add a note in the memo filed stating that this check is VOID and then save the transaction. Next, right-click on the tab you are working in and select ‘Duplicate’. A new tab will open already logged in to Quickbooks Online on the same screen. You may want to pull this tab out into its own new window so that you can view the two side-by-side.
On the new tab, close the transaction screen and navigate to the ‘New’ button on the left navigation bar. Select ‘Bank deposit’. In the dropdown field, enter the same bank account used to pay the check that you are voiding. Use today’s date, or another date in an open period. Next, in the section “Add funds to this deposit” (click to expand, if grid is not showing), use a row to enter the proper information in each field – received from (vendor name), account (probably the same account used on the check grid), description (“voided check #xxx”), payment method (“Check”), reference number (original check #), amount and class. Below is an example.
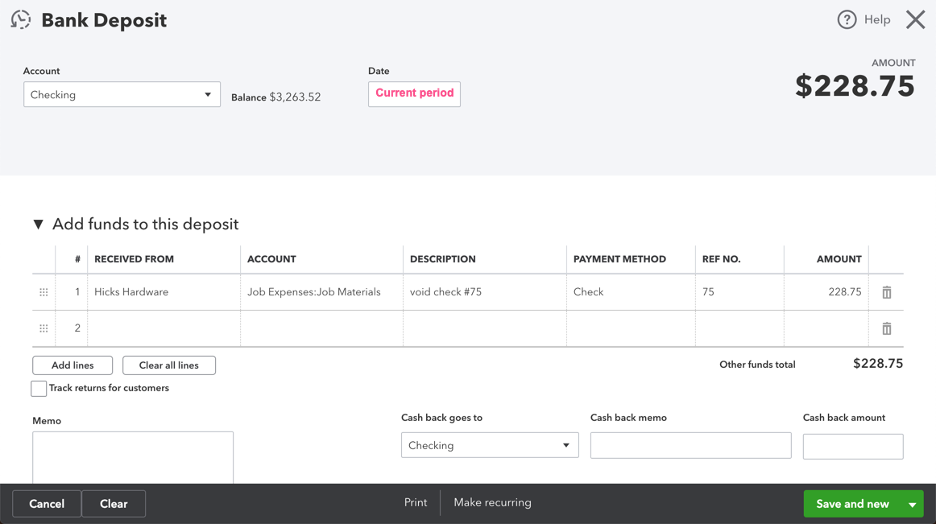
Save and close the deposit. This will debit (increase) the bank account and credit (most likely decrease) the account specified on screen, thereby reversing the effect on the general ledger of the original check that you wanted to void.
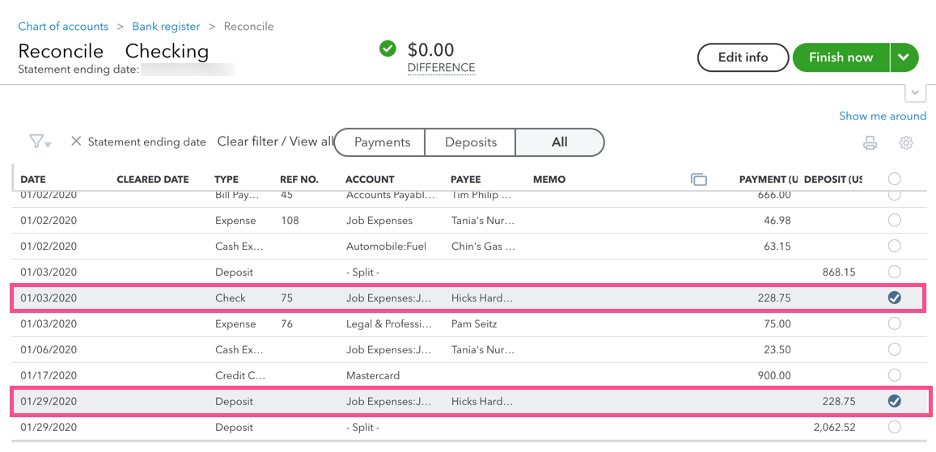
Now, navigate to the gear icon in the top toolbar, ‘Tools’ column, and then ‘Reconcile’. You may create a special adjusting reconciliation or wait and perform these steps on your next monthly statement reconciliation. Check the box next to the check that you want to void and next to the deposit that you entered to reverse the check. This should have a net zero effect on your reconciliation.
Done!
Void Bill Payment
Now…what if the transaction that you want to void is not a Check…what If it is a “Bill Payment”? In this case, locate the bill payment transaction and determine whether the bill payment is dated in a closed period.
If the bill payment is dated in an open period, click ‘More’, then ‘Void’ in the bottom menu bar as shown. This will debit (increase) the bank account and credit (increase) Accounts Payable, and the bill that the payment was associated to will now show as due again for you to pay.
In the case that the bill should not to be paid, regardless of if the bill payment is in an open or closed period, then, navigate to the bill transaction. If in an open period, delete it. If in a closed period, enter a Vendor Credit to reverse the transaction. Then go to the New button > Pay Bills screen to apply the vendor credit to the bill.
If the bill payment is dated in a closed period, don’t use the Void feature. That will zero out this bill payment at the original date of the transaction…and affect the general ledger in that closed-period, and change prior period account balances. First, verify that the bill payment is not reconciled by selecting ‘More’, then ‘Audit history’ in the bottom menu bar like in the picture below.
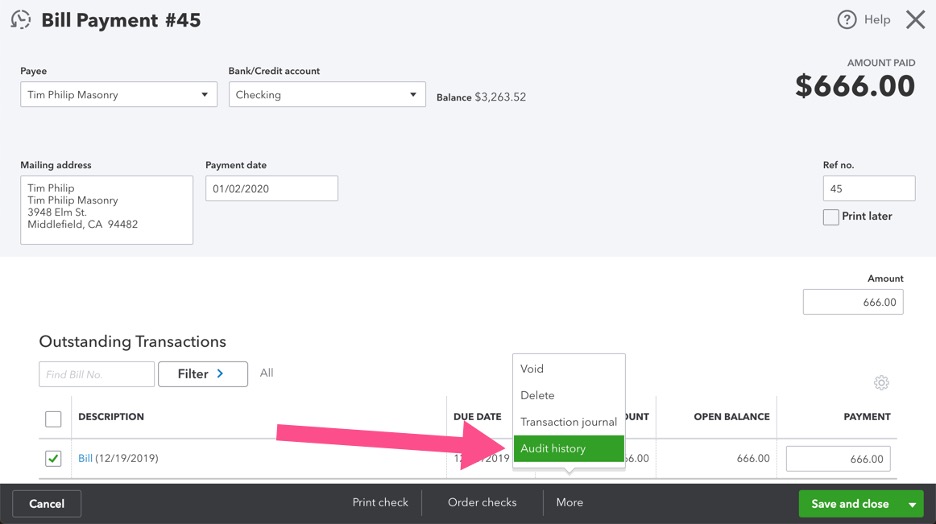
Now, expand the topmost entry to view the details. Pay attention to the ‘CLR’ column, here you can confirm the status.
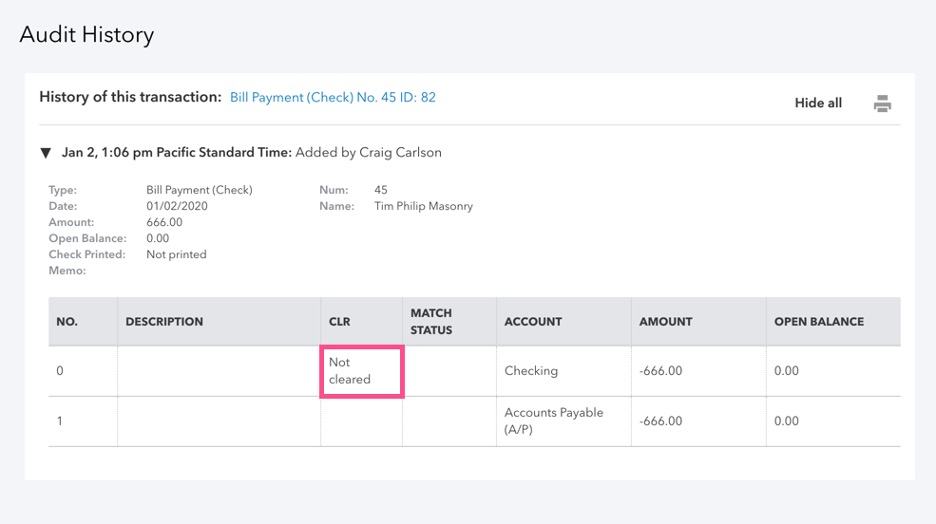
You can see that the check has not cleared, so click the blue hyperlink to return to the transaction screen and add a note in the memo line that this check is VOID. Next, uncheck the associated bill. Then save the transaction. That bill that the payment was associated to will now show as due again for you to pay.
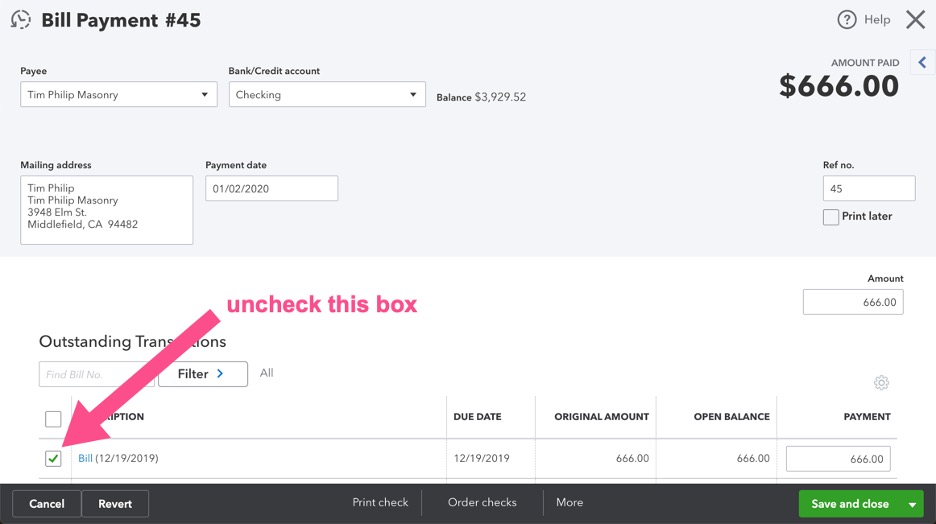
Right-click on the tab you are working in and select ‘Duplicate’. A new tab will open already logged in to Quickbooks Online on the same bill payment transaction screen. You may want to pull this tab out into its own new window so that you can view the two side-by-side.
On the new tab, close the transaction screen and navigate to the ‘New’ button on the left navigation bar, then select ‘Bank deposit’. In the dropdown field, enter the same bank account used on the bioll payment that you are voiding. Use today’s date, or another date in an open period. Next, in the section “Add funds to this deposit” (click to expand, if grid is not showing), use a row to enter received from (vendor name), account (Accounts Payable), description (“voided check #xxx”), payment method (“Check”), reference number (original check #), and amount.
Save and close. This will debit (increase) the bank account and credit (increase) Accounts Payable, thereby reversing the effect on the general ledger of the original bill payment that you wanted to void.
Now, navigate to the ‘New’ button, then ‘Pay Bills’. Locate the two open bills for the vendor for this same amount. One of them is the Bank Deposit you just entered. You may be able to tell by the date. You can click to view the transaction to determine which is the new Deposit and which is the original Bill.
Check the box in the row of the Deposit. Quickbooks Online will automatically apply the credit, which is the bill payment that you are voiding. Verify that the total payment amount in the upper right corner is $0. Below is an example.
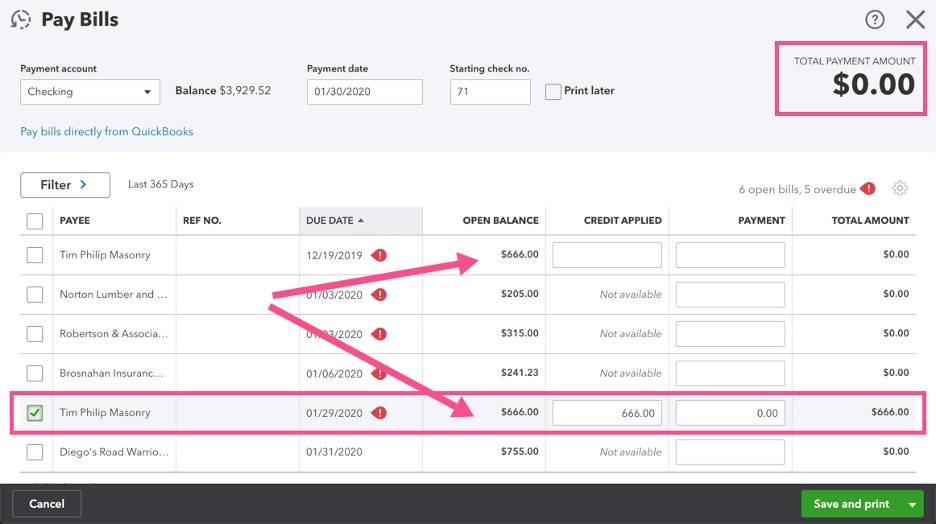
Finally, save and close.
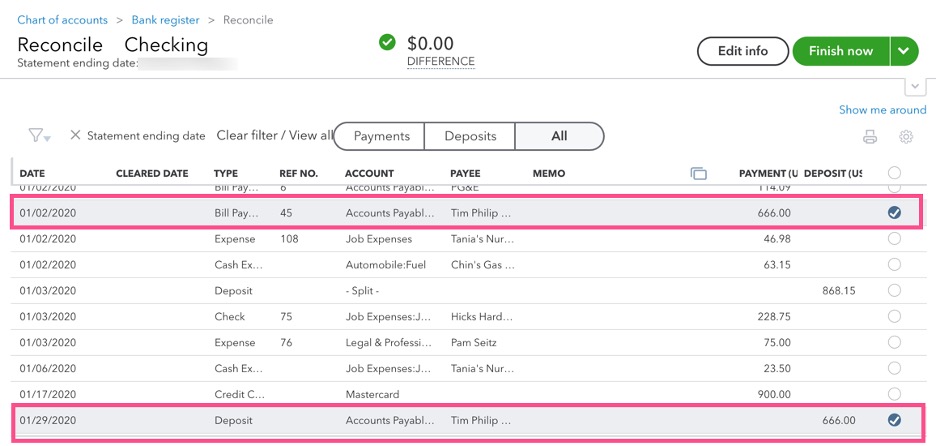
Now, navigate to the gear icon in the upper toolbar, ‘Tools’ column, ‘Reconcile’. You may create a special adjusting reconciliation or wait and perform these steps on your next monthly statement reconciliation. Check the box next to the bill payment that you want to void and next to the deposit that you entered to reverse the bill payment. This should have a net zero effect on your reconciliation.
Done!
The Redmond Accounting team has compiled all of our processes like this one into live interactive checklists to help you run your business efficiently. Our library of checklists goes beyond the basics of bookkeeping, including procedures for setting up new cloud integration. We’re enabling clients to manage their own books and go entirely virtual on their own, for much less than it would cost to have someone else do it.
If you’re looking to improve your bookkeeping workflow, schedule a complimentary consult so we can learn more about your business’s needs. We’d love to help you empower your business through accounting expertise and insight.


