Tips and Tricks with Chrome for QuickBooks Online, Part 2
Welcome back! In our last blog we gave some great tips and shortcuts to maximize your productivity and enhance your experience with Google Chrome, specifically tailored for QuickBooks Online (QBO) users. In Part 1, we covered basic Chrome tips that can enhance your workflow. Here, we’ll dive deeper into more advanced tips to help you navigate QBO more efficiently and make the most of Chrome’s features. Let’s get started!
CHROME TIP #6: Pin Tabs
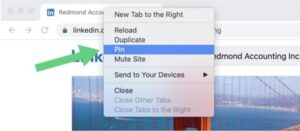
If you often find yourself juggling multiple tabs and want to keep your most important ones easily accessible, pinning them is a great solution. Pinning a tab in Chrome minimizes it to just the favicon (the small icon representing the website) and parks it on the far left of your tab bar. This keeps your essential tabs front and center without taking up too much space. Pinning a tab is easy.
- Find the tab you want to pin.
- Right-click on the tab.
- Select “Pin tab” from the dropdown menu.
Your tab will shrink down to just the icon, making it easy to find and access your most critical pages quickly.
CHROME TIP #7: Startup Pages
We all have a set of websites and apps that we use every day. (Like QBO!) By setting these as startup pages in Chrome, you can save time and streamline your daily routine. With these startup pages set, every time you open Chrome, your most-used pages will automatically load. Here is how you can set your Chrome to start with the pages YOU chose.
- Open a tab for each page you want to load at startup. Close any tabs you don’t want to include.
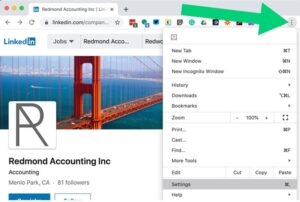
- Click the three dots in the upper right corner of your Chrome browser window and select “Settings.”
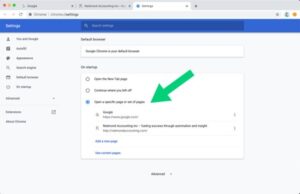
- Scroll down to the “On Startup” section.
- Choose “Open a specific page or set of pages” and click “Use current pages.”
Your selected tabs will now open each time you start Chrome, making it easier to jump straight into your work.
CHROME TIP #8: Reopen Closed Tab
If you’re like me, you probably have numerous tabs open at once, which makes it easy to accidentally close one. Chrome has a handy feature called “Reopen Closed Tab” that allows you to quickly recover any tab you’ve closed by mistake, without that moment of panic. It’s a quick and easy fix.
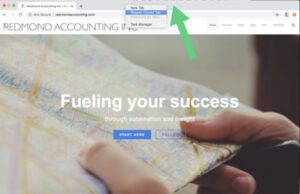
- Right-click on the tabs bar to the right of the last open tab.
- Select “Reopen Closed Tab.”
Alternatively, you can click on the three dots in the upper right corner, choose “History,” and see a list of recently closed tabs. This feature is a lifesaver for those moments when you close something important by accident.
CHROME TIP #9: Extensions
Chrome extensions are small software programs that customize your browsing experience. With over 180,000 extensions available, there’s something for everyone. Here are a few that can significantly enhance your productivity:
- Grammarly: Goes beyond spellcheck to catch embarrassing typos before you share content or send an email.
- Print Friendly & PDF Allows you to print (as a PDF) and save a clean version of a webpage.
- Zoom: Adds a Zoom meeting to any Google Calendar event with ease.
- Password Manager: Keeps track of your usernames and passwords securely.
These are just a few of the hundreds of available extensions that can make your life and your work easier.
How to Install Extensions:
- Visit the Chrome Web Store.
- Search for the extension you need.
- Click “Add to Chrome” and follow the prompts.
Extensions can greatly simplify your work processes and add valuable functionality to your browser.
CHROME TIP #10: Chrome People
Chrome’s “People” feature allows you to create different profiles, each with its own settings for bookmarks, extensions, autofill info, startup tabs, and privacy settings. This is particularly useful if you wear different hats, such as managing separate work and personal profiles, or even multiple work-related profiles.
Creating Multiple Chrome Profiles:
- Click the profile icon in the upper right corner of the Chrome window.
- Select “Add.”
- Follow the prompts to create a new profile, setting up its specific bookmarks, extensions, and other preferences.
By associating each profile with a Google account, you can sync these settings across all your devices. This allows you to stay organized and switch between different accounts effortlessly.
For example, I use separate profiles for “Work Me,” “Home Me,” and “QBO Me.” This setup lets me stay logged into all my accounts simultaneously and switch between them as needed. It’s especially handy for working in multiple QBO companies without having to log in and out repeatedly. You could also use different profiles for different clients to help prevent any mix-ups between projects.
Alternatively, you can use different browsers (e.g., Chrome, Safari, Edge, Firefox) or open a Chrome incognito window to manage multiple accounts simultaneously.
Conclusion
Mastering these advanced Chrome tips and tricks can significantly enhance your productivity, particularly when working with QuickBooks Online. By customizing Chrome to fit your unique needs, you’ll streamline your workflow and enjoy a smoother browsing experience. Keep exploring and experimenting with these features to find what works best for you.
If you need one-on-one guidance in setting up a cloud accounting system or want experts to do it for you, schedule a call here. If you’re a business owner or in-house accountant looking to DIY your cloud accounting system, sign up for our course where we walk you through all the ins and outs of how to do so. You can learn more about our course here.
Happy browsing!

