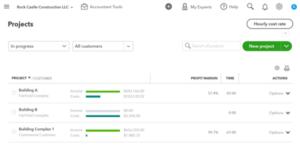
Many businesses operate on a project-by-project basis and require a system to track revenue, costs, and profitability for each project. QuickBooks Online’s Projects feature is a great tool that enables businesses to consolidate all project-related activities into one central location – the Projects Dashboard, also known as the Project Center. Let’s dive into the features, benefits, setup, and usage of Projects in QuickBooks Online.
Tracking Hours, Payroll, and Profitability with Quickbooks Projects
The Projects feature allows businesses to monitor key metrics such as hours worked, payroll expenses, and overall profitability for individual projects. From the Projects dashboard, users can:
- View a list of all projects.
- Analyze a line graph displaying income, costs, profit margins, and associated time for each project.
- Drill down into detailed insights by clicking on a project name to access the Project Overview screen.
This feature is available in QuickBooks Online Plus and Advanced, providing a convenient alternative to job costing using customer and sub-customer relationships.
Why Choose Projects Over Sub-Customers?
QBO’s Projects functionality extends the use of sub-customers by offering enhanced capabilities, including time cost tracking by employee or vendor which helps you to understand labor costs at a granular level. Another key advantage of using this feature over sub-customer is the Projects Dashboard
However, there are some limitations to consider when using Projects instead of sub-customers:
- Hierarchies: Projects support only one hierarchical level. While you can assign a project to a customer or sub-customer, sub-projects are not supported.
- Addresses: Projects inherit the parent customer’s address, unlike sub-customers, which can have unique billing and shipping addresses.
- Invoices: Projects require invoicing through the parent customer. To invoice a project separately, create a sub-customer, uncheck “Bill parent customer,” and assign the project to the sub-customer.
Additionally, neither project names nor sub-customer names appear on sales forms by default. To display these details, businesses can use custom fields on sales form templates.
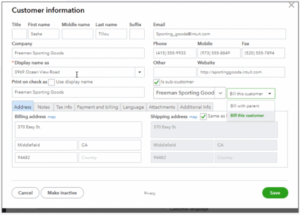
Setting Up Projects in QuickBooks Online
New QuickBooks Online subscriptions have the Projects feature enabled by default. For legacy subscriptions, follow these steps to enable or disable the feature:
- Go to the Gear icon > Account and Settings.
- Select the Advanced tab.
- In the Projects section, use the slider to enable or disable the feature.
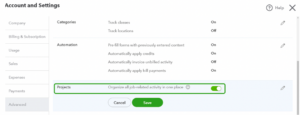
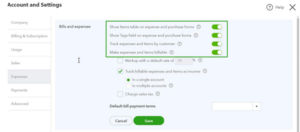
To optimize the Projects feature, ensure these settings are correctly configured in Account and Settings:
- Expenses tab:
- Enable “Show items table on expense and purchase forms” to improve job costing and reporting.
- Enable “Track expenses and items by customer” to include projects in the customer dropdown list on purchase transactions.
- (Optional) Enable “Make expenses and items billable” for time-and-materials jobs.
Converting Sub-Customers to Projects
For businesses currently using sub-customers, QuickBooks offers a straightforward way to transition to Projects. To convert a sub-customer to a project:
- Ensure the sub-customer meets these criteria:
- Only one level deep (no sub-sub-customers).
- Active and set to “Bill with Parent.”
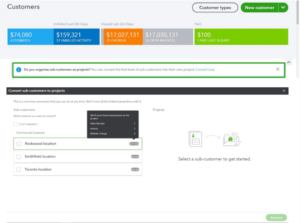
- Select Sales from the left navigation bar, then Customers.
- Look for the message box prompting you to convert sub-customers to projects. Click Convert now.
- Select the sub-customers you want to convert and click Convert now.
Important notes:
- Addresses, contacts, tax codes, and other specific sub-customer information will not transfer and will default to parent customer settings.
- Conversion is a one-time action and cannot be reversed.
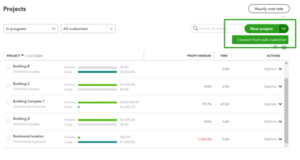
Alternatively, you can initiate the conversion from the Projects Center by selecting New project > Convert from sub-customer.
Creating a New Project
To create a new project:
- Navigate to the Projects Center and select New project.
- Enter the project name and select the associated customer or sub-customer.
- Add any relevant notes or details.
- Click Save.
Once created, the project can be added to transactions. For sales transactions, the project name appears in the Customer field. For purchase transactions, it’s listed in the Customer/Project column.
Using the Projects Center Dashboard
The Projects dashboard is a key advantage of using this feature over sub-customers. Here’s what you’ll find:
- Snapshot View: A summary of all projects, including income, costs, and profit margins.
- Filters: Options to filter projects by status (e.g., In Progress, Completed) or by customer name.
- Actions Column: Quickly edit, complete, cancel, or delete projects.
The income and cost graphs reflect data based on the business’s cash or accrual accounting method, which can be configured in Account and Settings > Advanced.
Exploring the Project Overview
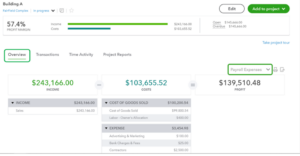
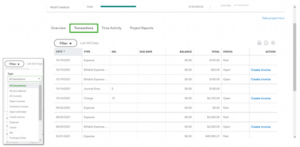
Clicking on a project name opens the Project Overview, which includes four tabs:
- Overview:
- View line graphs for income, costs, and profit margins.
- Analyze income and costs broken down by account, with links to generate Transaction Detail reports.
- Transactions:
- Displays all sales and purchase transactions linked to the project, including non-posting transactions like billable expenses and delayed charges.
- Filter by transaction type or time period.
- Time Activity:
- Shows time logs associated with the project, categorized by employee or service.
- View data by week, month, or service to understand labor contributions and costs.
- Project Reports:
- Access in-depth reports to assess project performance and profitability.
Maximizing Efficiency with Projects
The Projects feature in QuickBooks Online is a game-changer for businesses seeking better organization and tracking of project-based finances. With capabilities like real-time profitability insights, seamless time tracking, and centralized project management, businesses can enhance efficiency and make informed decisions. Whether transitioning from sub-customers or starting fresh, the Projects tool offers a streamlined approach to job costing and financial oversight.
Next week we will dive into Project Reporting and Labor Costing.


